
You will need the template HERE
Paintshop Pro HERE
Animations Shop(you can get it at the same place you got Paintshop Pro)
Tube of your Choice
I am Using the wonderful art of Lindsay Cheesewright which can be purchase HERE You can also visit her web page HERE
Font of your choice
open a new canvas 500 x 500 pixel
copy and paste your tube as a new layer
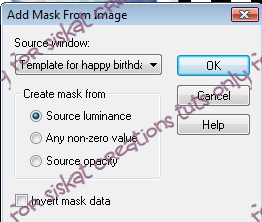
Flood the bottom layer with a light color from the tube, then make a new layer and flood that layer white, then take the template and click the eye on all layers except the bottom layer
(the mask layer )
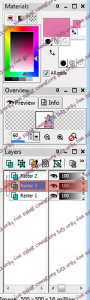
now go back to the tag and right click on the white layer on the layer section see image below(follow the steps below to do a mask layer):

now delete the mask layer when asked click yes
now merge the group
merge the group layer down
now go back to the template
uncheck all the layers eyes
grab your magic wand and click on the rectangle and flood with a color and then copy and paste on your tag under the tube layer
Place the rectangle towards the top of the tag.
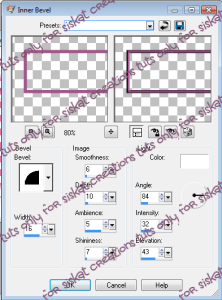
now go to effects>3D effect>inner bevel see below for my settings;
now duplicate the rectangle now go to Image menu see below;
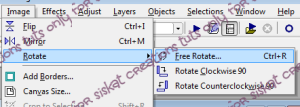
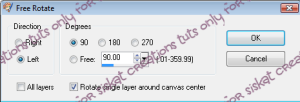
click free rotate left 90 make sure the all layer is uncheck see below:
Now go back to the template click on the balloon layer hit the wand in the empty space and then go to selections>click invert make a new layer and flood with yet another color from the tube
click all the eyes on the template except the two balloons
now go to the layers on the side and overlay the colored you just did. Merge copy and then go to your tag and paste under the tube and place where you wish. at this point you may rotate the balloon the way you like now go back to the template and click on the layer you flooded for the balloon and flood the dancing ants with another color from your tube you are using repeat this as many times you like. Once you have the balloons you want you can now delete the color layer on the template and right click your wand to deselect the balloon.
un check the eye for the happy birthday selection and click the eye for the balloon.
now go to adjust>hue and saturations>colorize pick the color you think will work for you.
Now copy and paste the words into the tag and place it in the rectangle.
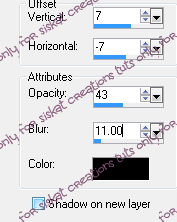
once everything is place you can go through the tag adding drop shadow to your layers
Here is my settings if you would like to use mine
Now click the eye on the first layer(raster 1) and merge all visible layers
Now uncheck the the eye
Now click on the top layer and add the COPY RIGHT of the artist and License if you are using a PTU(pay to use) artist. Make sure that the copyright info is readable
now if you don't want an animated tag your set and just save and add names I save a template that way i can offer the tag up in a group.
If you are going to animate lets get started;
Now open Animation Shop
While in psp click on the raster 1
duplicate the layer two times
now take your wand and click on the white section and invert the selection
now go to Adjust>Add/Remove Noise>add Noise
Here is my settings;
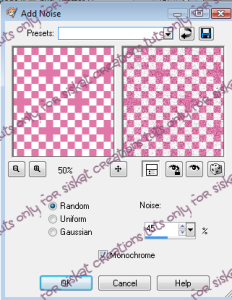
you want to click the random for the first layer uniform for the second layer and the Gaussian for the last layer as long as its not the tube layer you doing fine.
now deselect the dancing ants by right clicking on the tag.
now merge copy and go to your animation shop and paste as a new animation.
now go back to PSP and click the eye that you just copied and do a merge copy and paste after the frame do this one more time for the other layer.
in animation click view animation to see what you have done.
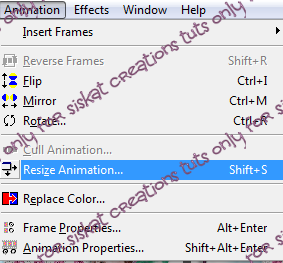
Great so far now you can re-size the tag in animation shop.
See below for settings and how to find the re-sizer;
now go back to psp close the tag you were making do not save. now go back to Animation shop and copy the frame and take it to psp and paste it as a new image.
now type the name you like and place it where you like and it looks nice and convert it to raster. Remember how we beveled the rectangle now do that to the name and add drop shadow. Now click the eye on the bottom layer. Now merge copy.
Go to Animation shop an click on the first frame go to Edit>select all frames.
go back to edit>propagate Paste.
Now click on the top bar and paste into frame
you will have to move the name until it is were you like then click.
if you would like to save a template do it before you add a name.
Now save your tag once the name is on and your ready to show off your work and offer it up if you like.
* TIP what i do is save the frame in PSP with the name of the font on the layer this way I have a font template too so the tags look a like when offering for others.
This tut was made by me and no one else if it resembles any one that is pure coincidental

Paintshop Pro HERE
Animations Shop(you can get it at the same place you got Paintshop Pro)
Tube of your Choice
I am Using the wonderful art of Lindsay Cheesewright which can be purchase HERE You can also visit her web page HERE
Font of your choice
open a new canvas 500 x 500 pixel
copy and paste your tube as a new layer
Flood the bottom layer with a light color from the tube, then make a new layer and flood that layer white, then take the template and click the eye on all layers except the bottom layer
(the mask layer )
now go back to the tag and right click on the white layer on the layer section see image below(follow the steps below to do a mask layer):


now delete the mask layer when asked click yes
now merge the group
merge the group layer down
now go back to the template
uncheck all the layers eyes
grab your magic wand and click on the rectangle and flood with a color and then copy and paste on your tag under the tube layer
Place the rectangle towards the top of the tag.
now go to effects>3D effect>inner bevel see below for my settings;

now duplicate the rectangle now go to Image menu see below;

click free rotate left 90 make sure the all layer is uncheck see below:

Now go back to the template click on the balloon layer hit the wand in the empty space and then go to selections>click invert make a new layer and flood with yet another color from the tube
click all the eyes on the template except the two balloons
now go to the layers on the side and overlay the colored you just did. Merge copy and then go to your tag and paste under the tube and place where you wish. at this point you may rotate the balloon the way you like now go back to the template and click on the layer you flooded for the balloon and flood the dancing ants with another color from your tube you are using repeat this as many times you like. Once you have the balloons you want you can now delete the color layer on the template and right click your wand to deselect the balloon.
un check the eye for the happy birthday selection and click the eye for the balloon.
now go to adjust>hue and saturations>colorize pick the color you think will work for you.
Now copy and paste the words into the tag and place it in the rectangle.
once everything is place you can go through the tag adding drop shadow to your layers
Here is my settings if you would like to use mine

Now click the eye on the first layer(raster 1) and merge all visible layers
Now uncheck the the eye
Now click on the top layer and add the COPY RIGHT of the artist and License if you are using a PTU(pay to use) artist. Make sure that the copyright info is readable
now if you don't want an animated tag your set and just save and add names I save a template that way i can offer the tag up in a group.
If you are going to animate lets get started;
Now open Animation Shop
While in psp click on the raster 1
duplicate the layer two times
now take your wand and click on the white section and invert the selection
now go to Adjust>Add/Remove Noise>add Noise
Here is my settings;

you want to click the random for the first layer uniform for the second layer and the Gaussian for the last layer as long as its not the tube layer you doing fine.
now deselect the dancing ants by right clicking on the tag.
now merge copy and go to your animation shop and paste as a new animation.
now go back to PSP and click the eye that you just copied and do a merge copy and paste after the frame do this one more time for the other layer.
in animation click view animation to see what you have done.
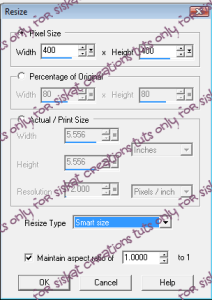
Great so far now you can re-size the tag in animation shop.
See below for settings and how to find the re-sizer;


now go back to psp close the tag you were making do not save. now go back to Animation shop and copy the frame and take it to psp and paste it as a new image.
now type the name you like and place it where you like and it looks nice and convert it to raster. Remember how we beveled the rectangle now do that to the name and add drop shadow. Now click the eye on the bottom layer. Now merge copy.
Go to Animation shop an click on the first frame go to Edit>select all frames.
go back to edit>propagate Paste.
Now click on the top bar and paste into frame
you will have to move the name until it is were you like then click.
if you would like to save a template do it before you add a name.
Now save your tag once the name is on and your ready to show off your work and offer it up if you like.
* TIP what i do is save the frame in PSP with the name of the font on the layer this way I have a font template too so the tags look a like when offering for others.
This tut was made by me and no one else if it resembles any one that is pure coincidental


No comments:
Post a Comment