Valentines

Items need to do this tut:
I am using Paintshop pro 9 which you can get a trial HERE
I am using the wonderful art of Amy Rowland the tube that can be purchased HERE You can also view more of her art HERE at her web page.
PLUGINS:
alien skin Xenofex2 HERE
FONT:
TypoUpright BT HERE
Materials: CLICK HERE
paper
Template
Mask
Word art
Embellishments
TUT SECTION:
open paper copy and paste as new image close out the original.
Now go to Xenofex2 and click on burnt edges
I use this setting for Burnt Edges:
See below in the image:
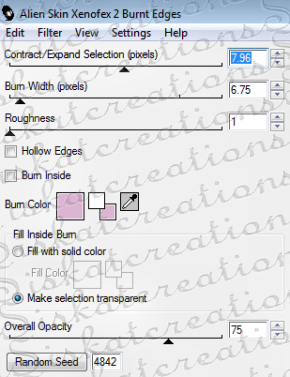
Add a new raster and move it below the paper layer..
Flood the new layer white
now take the heart layer of the template and copy it and paste as a new layer
take your wand and click in the middle of the large heart and make a new raster copy and paste into the selection your tube
now while the selection click on the paper layer and promote selection to Layer now deselect the wand by right clicking on the tag and now move the promoted paper to the layer above the template. so now you should have the color heart between the tube and the template
now on the color heart sharpen it twice.
Merge the color heart down to the template layer.
Now for the tube set the blend mode off to the right of the layer section to Luminance (legacy) Merge down to the template.
Now click in the small heart with your wand and make a new raster. Now copy and paste the tube into the selection now click back on the template layer in the layer section and flood the little heart white.
Merge the tube down to the template.
Now paste the tube as a new layer and resize 60% x 60% resample using set for smart size. flip the image from right viewing to left viewing and move to the lower right corner. Add drop shadow to your tube
Now click on the paper layer and apply your mask by right click on the raster layer in layer section.
Delete mask and when asked click yes and merge group.
Now take your magic wand and click in the heart at the bottom of the template. Now go to Adjust>BLUR> gaussian blur my settings is Radius 24.00
then go to Adjust> HUE & SATURATION>colorize setting of mine is Hue 199 saturation 48
Now add the word art. Color it the color you like and add drop shadow and place where you like. add the tag plate from the template put it between the tube layer and the heart layer and color it the color you like that matches the tube.
now add the embellishment to your tag place them where you like.
now add your drop shadow to the embellishment and merge all layers
Add the copyright info of the artist you used and dont forget your license if you are using a PTU artist.
Merge all together at this point if you don't want the white layer you can delete it
once you have done all the above you may resize the tag to the size you like as long as the copyright is legible(readable)
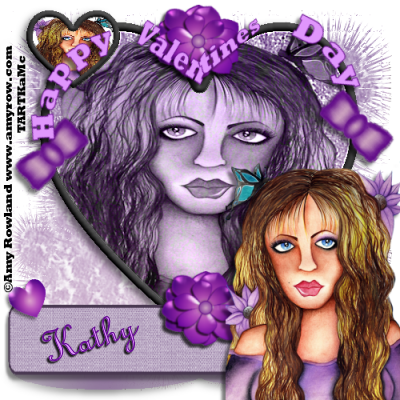
Add your name and enjoy.
I hope you enjoyed this tut I would like to see what you made I have a web where i can post the tag. This tut is my own making if it looks like someone else it pure coincidental.

Items need to do this tut:
I am using Paintshop pro 9 which you can get a trial HERE
I am using the wonderful art of Amy Rowland the tube that can be purchased HERE You can also view more of her art HERE at her web page.
PLUGINS:
alien skin Xenofex2 HERE
FONT:
TypoUpright BT HERE
Materials: CLICK HERE
paper
Template
Mask
Word art
Embellishments
TUT SECTION:
open paper copy and paste as new image close out the original.
Now go to Xenofex2 and click on burnt edges
I use this setting for Burnt Edges:
See below in the image:

Add a new raster and move it below the paper layer..
Flood the new layer white
now take the heart layer of the template and copy it and paste as a new layer
take your wand and click in the middle of the large heart and make a new raster copy and paste into the selection your tube
now while the selection click on the paper layer and promote selection to Layer now deselect the wand by right clicking on the tag and now move the promoted paper to the layer above the template. so now you should have the color heart between the tube and the template
now on the color heart sharpen it twice.
Merge the color heart down to the template layer.
Now for the tube set the blend mode off to the right of the layer section to Luminance (legacy) Merge down to the template.
Now click in the small heart with your wand and make a new raster. Now copy and paste the tube into the selection now click back on the template layer in the layer section and flood the little heart white.
Merge the tube down to the template.
Now paste the tube as a new layer and resize 60% x 60% resample using set for smart size. flip the image from right viewing to left viewing and move to the lower right corner. Add drop shadow to your tube
Now click on the paper layer and apply your mask by right click on the raster layer in layer section.
Delete mask and when asked click yes and merge group.
Now take your magic wand and click in the heart at the bottom of the template. Now go to Adjust>BLUR> gaussian blur my settings is Radius 24.00
then go to Adjust> HUE & SATURATION>colorize setting of mine is Hue 199 saturation 48
Now add the word art. Color it the color you like and add drop shadow and place where you like. add the tag plate from the template put it between the tube layer and the heart layer and color it the color you like that matches the tube.
now add the embellishment to your tag place them where you like.
now add your drop shadow to the embellishment and merge all layers
Add the copyright info of the artist you used and dont forget your license if you are using a PTU artist.
Merge all together at this point if you don't want the white layer you can delete it
once you have done all the above you may resize the tag to the size you like as long as the copyright is legible(readable)
Add your name and enjoy.
I hope you enjoyed this tut I would like to see what you made I have a web where i can post the tag. This tut is my own making if it looks like someone else it pure coincidental.


No comments:
Post a Comment