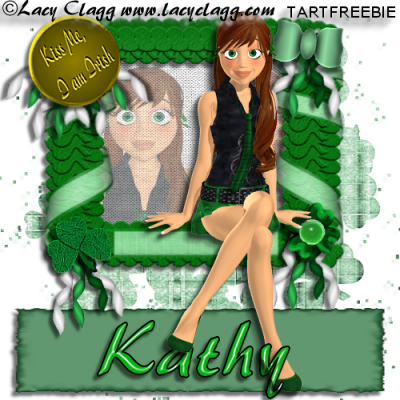
Your choice of tube I am using the wonderful work of Lacy Clagg which can be purchased HERE
Items to do this tut:
Paintshop Pro HERE
Font:
Brush455 BT HERE
Plugins:
Eye Candy 4 HERE
Supplies:
I am using my Saint Patty scrap kit DOWNLOAD
Open a new image 500 x 500 pixels
Copy and paste frame of choice into the new image we will be calling tag
Now pick a paper from the papers and copy and paste as new raster and move below the frame
Apply mask to the raster layer of the paper, merge mask group
now copy and paste tubes each as a new layer if your using the tubes i am you would want to resize the head to fit in the frame and the duplicate and flip and merge the two head together and lower occupancy to 75% make a new raster under the heads and merge the heads down to the blank raster
Now grab a few embellishments and play with them by placing them where you like in the tag you may have to resize some of the items once you have them placed where you like and drop shadow added to the items click the eye on the top tube then merge all visible now uncheck the top tube and add copy right info make sure it legable and that it can be easily seen now add the name or text info between the tube and the other part of the tag.
To do the text I am doing you need Eye Candy 4
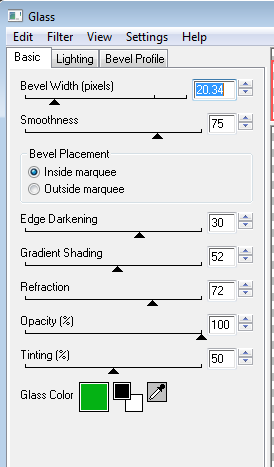
Type in your text duplicate Effects>3D effect>inner bevel the go to eye candy 4>Glass see below for my settings
Now go to the orignal font layer add drop shadow now go to the layer we just applied Eye candy to and set the blend mode to Multiply. merge and share or keep as an orignal tag.
Now resize tag and add copy right info and save make sure the copy right is readable
I hope you enjoyed this tut I would like to see what you made I have a web where i can post the tag. This tut is my own making if it looks like someone else's it pure coincidental.


No comments:
Post a Comment